A mixing bowl for the cookie basket:
Wednesday, July 28, 2010
Gift Baskets
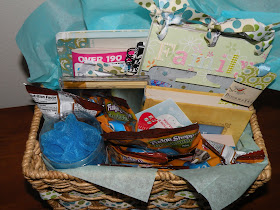
I recently discovered I really enjoy making gift baskets for people. I especially like finding something unique to use as the "basket"
Wednesday, July 21, 2010
Shaped Scrapbook
This album was really fun to make. I loved the challenge of making it look good from the cover, without distorting the balance of individual pages. This time I bought the album (it was plain chipboard in the shapes of FAMILY, and you covered and bound it yourself) but now that I have seen how it works, I could make the letters myself and save some money. I'm looking forward to doing this type of album again!
This was part of Kayla's Christmas present last year, and I used the same ribbons to decorate a notebook and the basket all her goodies went in.

This was part of Kayla's Christmas present last year, and I used the same ribbons to decorate a notebook and the basket all her goodies went in.

Wednesday, July 14, 2010
Christmas Stockings
These are the stocking I made for us last Christmas. Our theme(s) is John Deere, Red, and Mooses. Tony wanted a John Deere stocking and I wanted red, so to blend the two I made Cadence a combination. They were fairly simple to make, and are nice and sturdy so they can hold a lot :) I went ahead and lined the front so the patchwork wouldn't unravel or catch on things, but the back is just thick felt. The names are applique.


Wednesday, July 7, 2010
Tag-ish Ball


I saw a ball with tags on in a baby magezine and thought, "ooh, Cadence would love that!" Then I saw the price and thought, "oooh, Tony would hate that!" So I made her one myself.
It is the size a tennis ball, and is filled with rice, so it is nice and soft. It can also be heated in the microwave and used as a hot pack!
Instructions:
Cut 4 pieces of the pattern below, from fabrics of your choice.
Cut as many ribbons as you like, about 6 inches in length each.
Quickly stitch the ends together to make them easier to work with.
Lay two fabric pieces right sides together.
Tuck a ribbon or two between the fabric pieces along one side so the end of the ribbon butts up against the edge, and the loop of the ribbon is between the fabric pieces, not sticking out.
Sew this side, using a 1/4 inch seam allowance.
Unfold, and repeat with next pieces.
The last piece will be a little more difficult to work with since all the other sides are in the way, but you can do it!
Only sew the last pieces about 3/4 of the way up.
Turn right side out.
Use a funnel to fill with rice, leaving some space so the ball will be soft.
Use a slip stitch to finish sewing up the last side.
.JPG)
.JPG)
.JPG)
.JPG)
.JPG)
.JPG)


