Wednesday, June 30, 2010

Fourth of July Sign

When Tony made my big sign, he made extra small ones for me to paint with the seasons and holidays. I really wanted to make it in time for the fourth of July, since it is one of my favorite results.

About halfway through this project I was really frustrated and depressed. The fireworks looked bulky and awkward, and the adhesive I used on the letters this time was too permenant - it left paper and gunk stuck to everything. I would up having to scrape it off with my thumb (ouch!) and do a ton of touchup. But it turned out alright in the end - the bulkiness of the fireworks is acually good, since thats the only way you can see them from the street, and the letters look fine after touch-up. Thankfully!

(Kristina don't look too close... the crooked L and R are bugging me to death, so I know they will you too - don't you just love how I deliberately gave you something to irritate your OCD, and did it so it seemed like I was being nice?)


Saturday, June 12, 2010

Chancellor Manor Sign

I just finished my first experiement with decorative painting. Tony made me a sign post for Mother's Day, and I was charged with painting the sign to go on it. Since it was my first try and I know nothing about painting, I was a little excited and more than a little nervous about how it would turn out.

I planned to do it in three layers - white, then blue, then red.

Come to find out, painting involves a lot of waiting... which I am NOT good at. But other than that, it was really fun. I'm going to enjoy doing more of it.

I used my Cricut to cut out stars and letters to use as stencils. I painted the white, let it dry, then taped off the stars and the blue middle. I meant to tape of the "Manor" letters too, but I forgot. It definately would have been easier that way, but I made it work.

I also made a white frame for the middle.


I wound up placing the outline of the letters I had cut out (you can see it at the top of the picture) and painting inside it. Much more difficult (for me) and it took two layers since I was doing white on blue instead of the other way around. Oh well... after I did touch-up, it looked pretty good.

Next I taped off the stripes for the red. That part was really easy - all straight lines. The scary part was free-handing the "Chancellor" letters. I was afraid I was going to mess up really bad and ruin the whole thing on the last step. I hardly ever freehand anything, even in my scrapbook (I prefer to type), and I had no practice free-handing with a paint brush. But, it turned out just fine. I wrote the word on with pencil so I could correct any lumpy parts in the script, then traced over it with paint.

Yay! It's finished! I'm planning to paint seasonal signs that are a little smaller to hang on the small hooks at the bottom. Looking forward to putting my new skills and experiences to use on those!


Friday, June 11, 2010

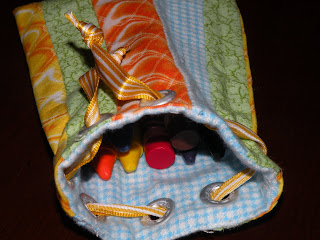
Crayon Bag

I made this bag for Cadence to take her crayons to chuch in. I started out with grand plans to make it a miniature version of the Knitting Bag, with pockets and a zipper for later when she could put crayons in individual slots, and a drawstring for now, when she only has the motorskills for putting them in a bag. Yeah... after ripping the zipper out twice, stitching it in a third time, and it STILL wasn't working, I scratched that idea and just made a lined drawstring bag. The other way would have been cool - but this way is DONE. Maybe someday in the far future I'll make her something with individual slots. I've pretty much decided to do a crayon roll up that she can also use as an apron, but she won't need that for a long while yet :) (Thankfully!)


I've also made her some other toys and bags with these fabrics. I'll have to post about them next!

Knitting Needle Roll Up


This was super easy to make, and fun too. I just used the tutorial from this website.

This knitting needle roll up will hold tons of needles and supplies, but it rolls and ties into a really small, easy to carry bundle.

Saturday, June 5, 2010

Knitting Bag Tutorial


Whew! This bag was a lot of fun to make, and it turned out better than I expected. It's based on the Nantuckett Bagg. I made it for Kristina's birthday present.

This bag does everything. It has a drawstring top that doubles as handles. It can zip up or open completely flat for easy access of all your supplies. It is completely reverseable.

It was a great challenge for me because I had to design my own pattern and then try it out. Two things I would change:
It is REALLY tall, so I would use a shorter zipper and height next time.
It is kind of floppy, so I would find a stiffener to insert between the inner and outer fabric layers so it would stand upright on its own. Actually, fixing the first problem would probably also fix the second problem since it is used for storing knitting needles, and those would hold it upright.

Since I had written out the instructions for myself, I went ahead and added some pictures and Tah-Dah! I tried to embed it, but it wasn't working out for me so - Here is a link to the PDF, where you can download it or print it or whatever: